Technique Lessons
Warm Up
Warming up is an essential step before any show or practice session. Not only does it helps to improve the overall performance of the musician, it also builds confidence and greatly reduces the risk of getting hurt while playing. Here we have a series of exercises that you can use to create your own warmup routine.
Body position & stretching | String Skipping Pt. I (Right Hand) |
Left Hand Exercises | String Skipping Pt. II (Right Hand) |
Chromatic Warm Up | String Skipping Pt. III (Hands' Synchronization) |
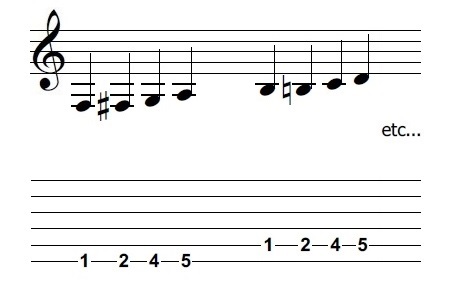
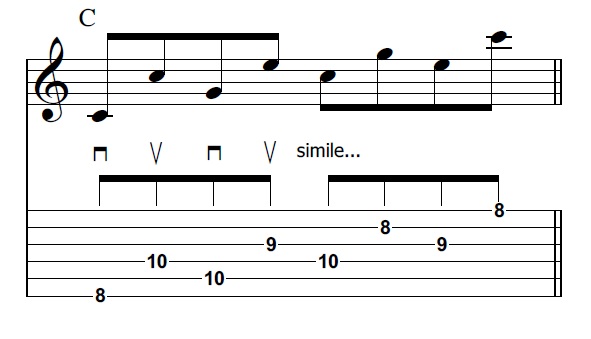
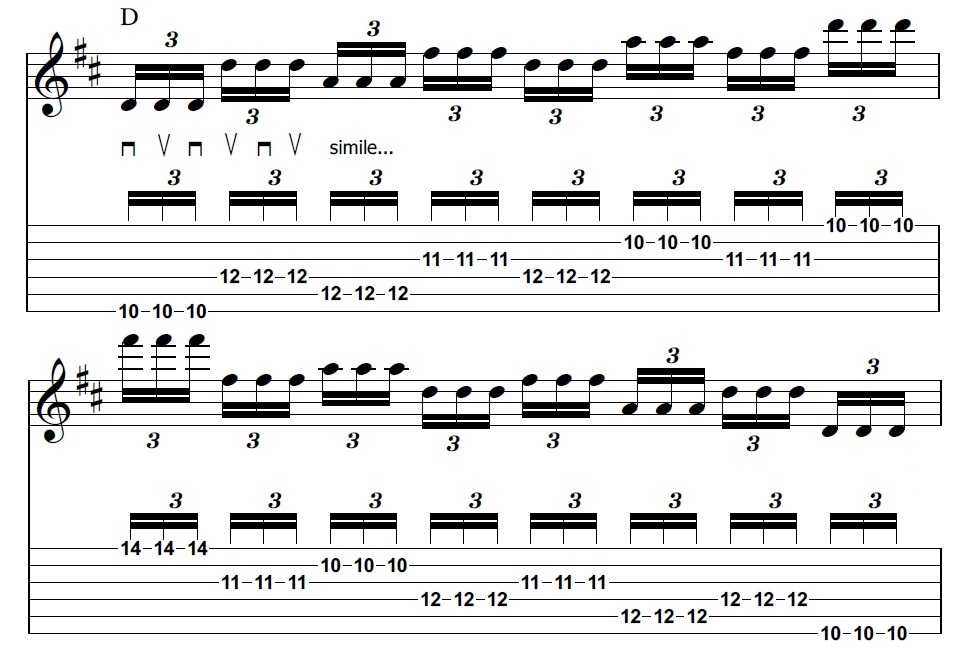
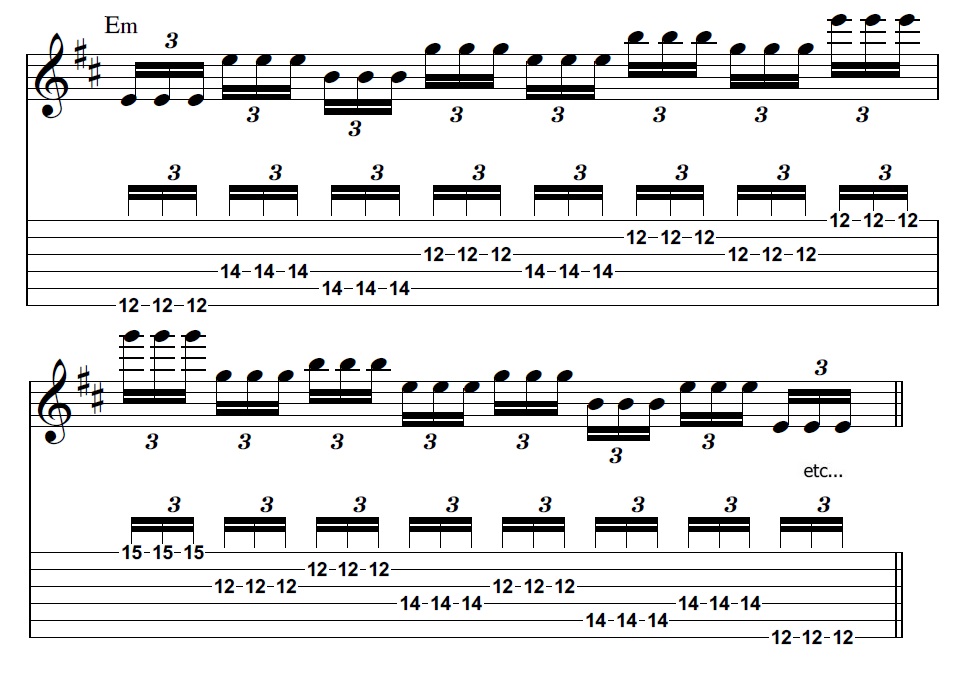
Chromatic Warm Up
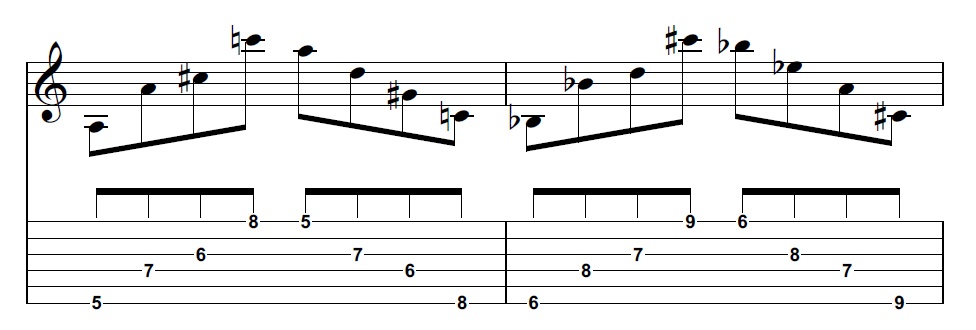
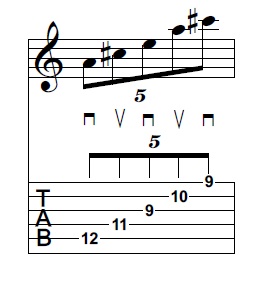
The Chromatic Warm Up is a classic exercise: every guitarist has at least done it once, and it is highly recommended to include it as part of a daily routine. It basically involves playing an ascending run of chromatic notes as shown below:
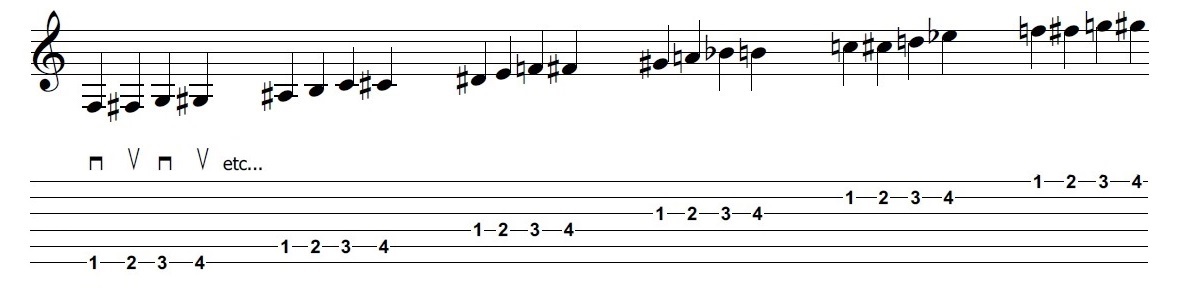
When you reach the fourth note on the high E string, you just halft a tone up by sliding your finger, and go back to the low E string in the reverse order. Then move on to the third fret, etc.
As for the right hand, this exercise can be done using alternate picking or, if you play finger style, alternating index and middle fingers. Whatever the technique you use in the right hand, it is important to keep it strictly controlled: that way the exercise will be serving the double purpose of warming up your left hand and getting your right hand/left hand coordination up to scratch. If something doesn't sound correct (maybe you're picking in one direction only, or your right hand nails sound uneven) it is better to stop and correct that, to avoid repeating the same mistake again and again.
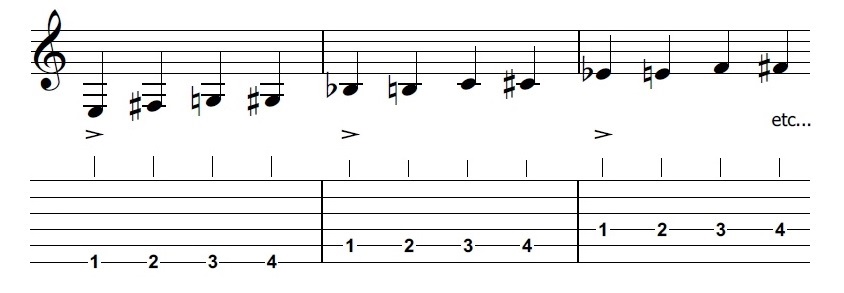
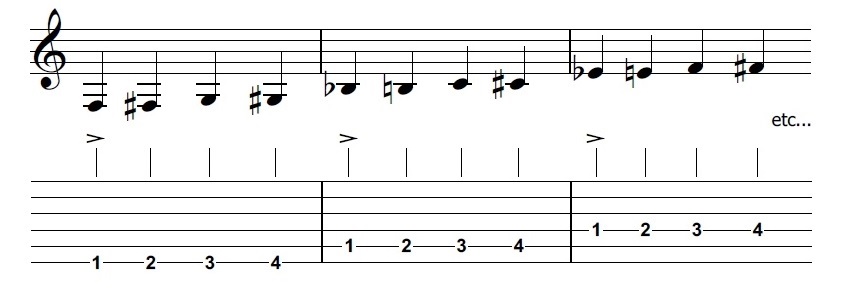
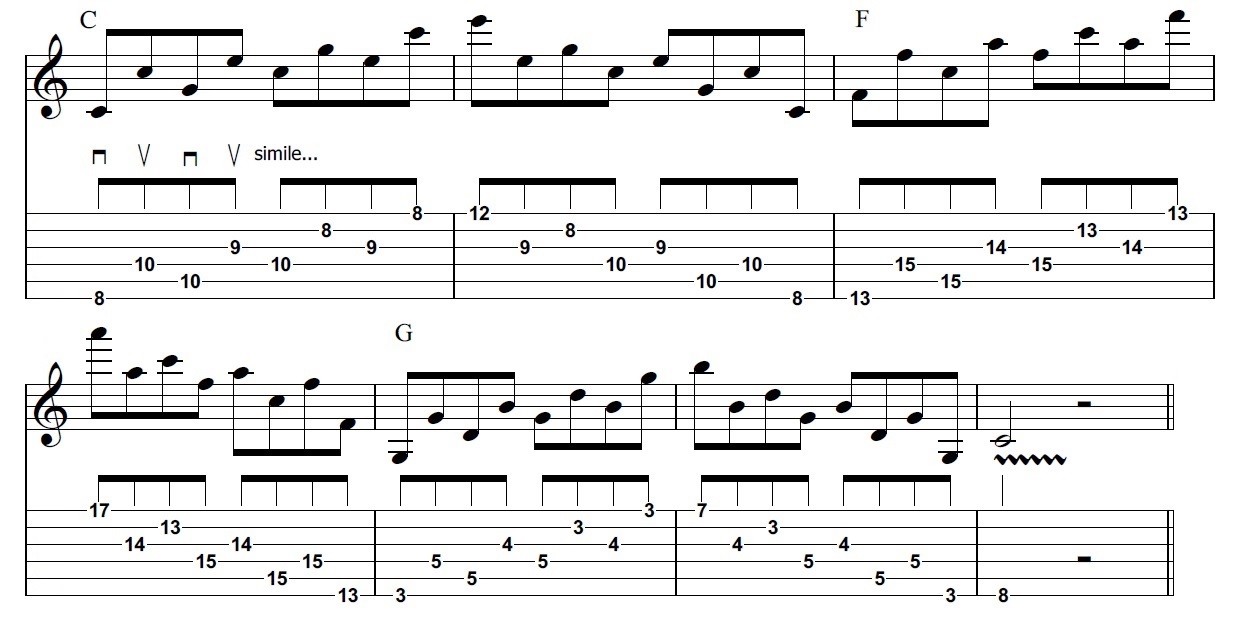
There are multiple variations on this basic exercise. You may want to try the following order:
I. Start really slowly, play the first F note and let it ring clearly for at least two seconds before going up a fret. When you press the following fret, your left index finger should rest on the first fret without moving. As you go up, your fingers should rest where they are until they have to move again: it is essential to avoid unnecessary hand movement, as it will greatly hinder your speed, acurracy, and stamina. Practice this way for a couple of minutes, letting every note ring and concentrating on keeping your movements to the minimum.
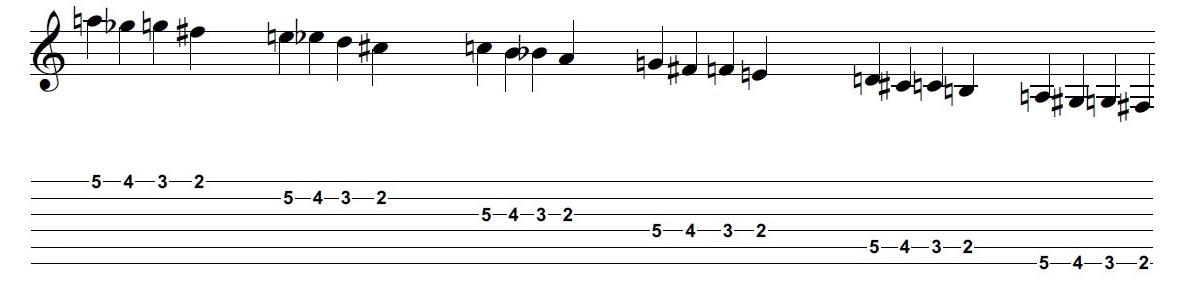
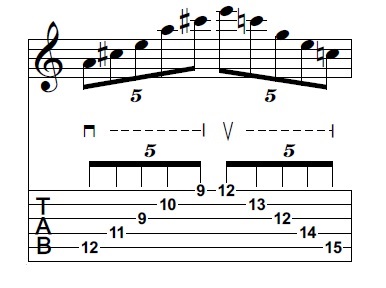
II. After that, you can try adding additional stretches between fingers, as shown below. Try these for a couple of minutes also.
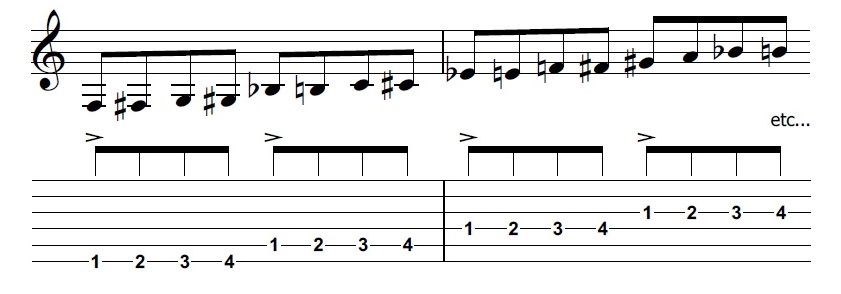
III. Set your metronome slow (at 60, for example) and start playing as below, with each click of the metronome corresponding to a note. Once you feel confident you can go up in speed (but not too fast), always making sure that every note sounds crystal clear. You may want to add a little acent to the first note of eachgroup of four: it is a good way to create a reference point to avoid 'getting lost' when you reach high speeds, so it's better to incorporate in early on. In any case, you don't want to reach extreme speed in this particular exercise, but rather acquire a flowing sound and watch closely the movement of your fingers, trying to keep it down to the minimum possible
.
IV. Now you can add stretches to the exercise. Watch out for that difficult stretch between the ring and middle fingers, it will probably slow you down.
V. Once you've got the hang of the exercise, you can start playing more than one note per beat of the metronome. Start with eight notes and eventually try with sixteenth notes, always keeping the accent on the first of every four notes. Remember that right now this isn't about speed but the intelligibility of your sound.

VI. A popular variation on this exercise involves starting the pattern on each string with a different finger. This helps build hand independence.
Every warmup should have the double purpose of preparing you for practice or playing, while at the same time consolidating your technique. These chromatic runs are actually an excellent tool to build speed. You are encouraged to come up with new patterns and try them out all the way up the neck of the guitar. Start pushing the metronome by 4 points every time, and check that every note you play sounds clear and differentiated from the last one. For an additional challenge, try to do some of the exercises starting with a upstroke: this is a way of tweaking old exercises into something new, and it serves as preparation for multiple situations you may encounter when playing.
Left Hand Exercises
The goal of this simple series of exercises is to prepare the left hand for the technical difficulties that may arise during a rehearsal, practice session, or show. As opposed to the right hand, the left hand usually has to perform really complex finger independence feats, as well as having a remarkable elasticity.
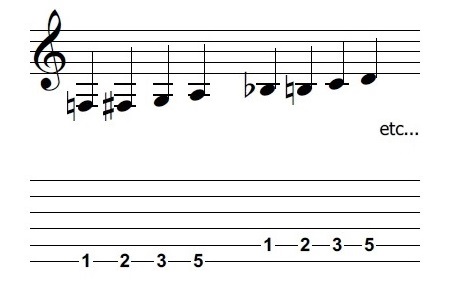
In order to prepare the left hand, it is convenient to have a routine that deals with stretches in a progressive fashion. Play the following melodies, taking care that your left hand fingers rest where they have just pressed the strings and move the minimum possible when the adjacent finger is playing. This will help you maintain the shapes and get the left hand working.
You may play the notes with alternate picking, down-picking only, or your fingers. You can play the melodies note per note or just strum each group of four notes as a chord. It is also recommended to start the exercise on different strings, and in different positions of the neck (taking particular care to avoid the lower positions, as these demand extreme stretches and may hurt your hand if you play them carelessly). The example below shows a variation of the exercise beginning on the sixth fret, and a second one on the eight fret and ranging from the second to the fifth string.
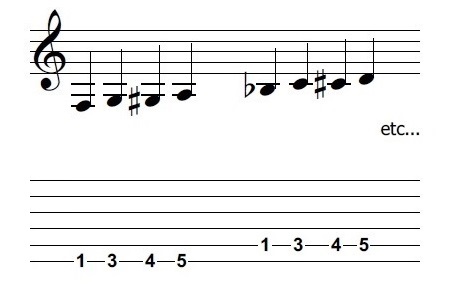
Once you have done this a number of times, you can proceed to adding some stretches.
And finally, try the hardest stretches, between the ring and middle fingers.
Once you've completed this routine, you are encouraged to try combinations of all these exercises, also alternating between strumming and picking each note individually.
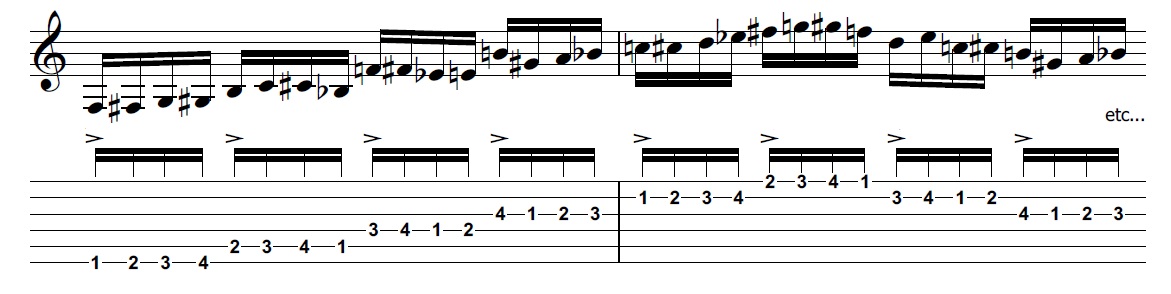
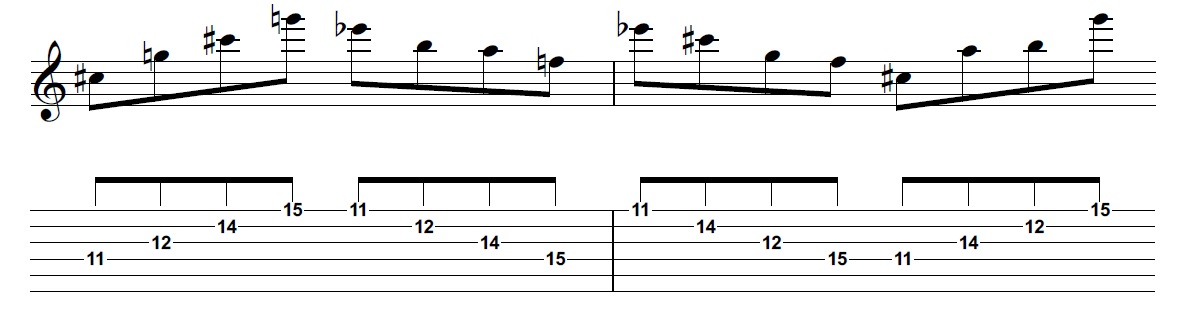
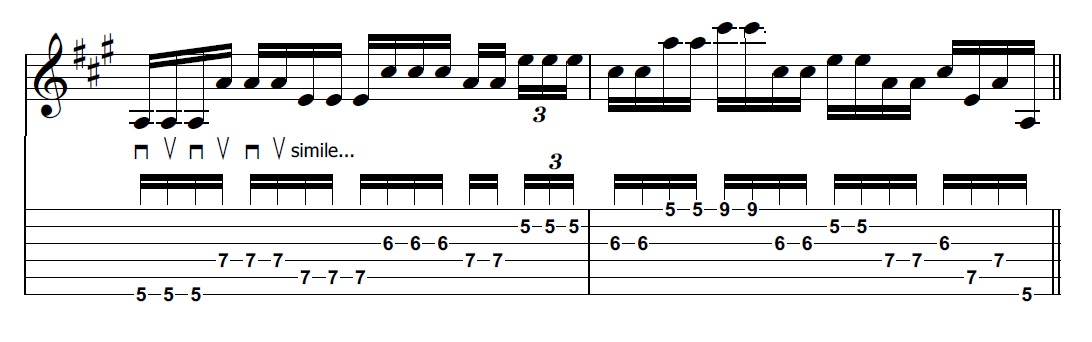
String Skipping Pt. I
This series of exercises focus on warming up the right hand, while also helping to develop some right-left hand coordination. They should be done using alternate picking: the process of skipping strings forces the precision of the picking hand. The exercises are based on a barred chord shape, with a third added when reaching the first string. Pay attention to the picking indications.
Try the following sequence of chords, now with the aid of a metronome. After a while it becomes particularly difficult to keep up with the metronome, as this technique exerts considerable demands on the right hand, so start slow.
It should be noted that the previous exercises contained only major chords. Using minor chords involves an additional difficulty, as the chord shape requires the index finger to play several notes on the same fret (shown between brackets).
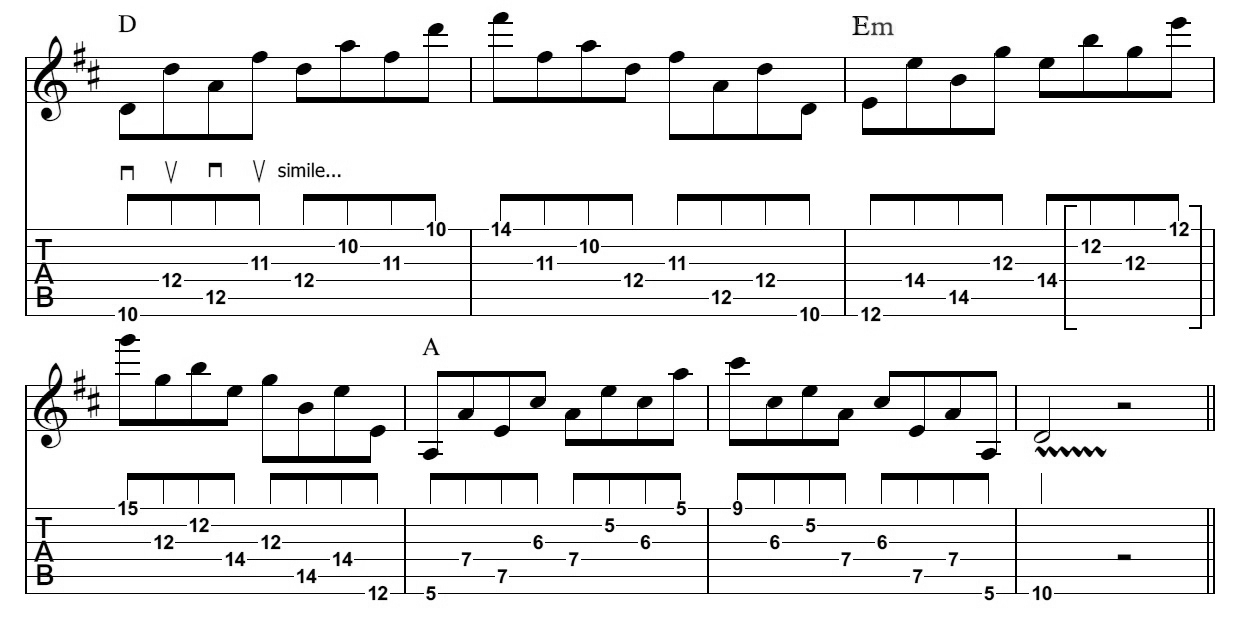
Finally, you can play in sixteenth notes -adding a second stroke to every note- in order to create a interesting variation. It is advisable to first approach these exercises playing legato, and then try different amounts of palm muting.
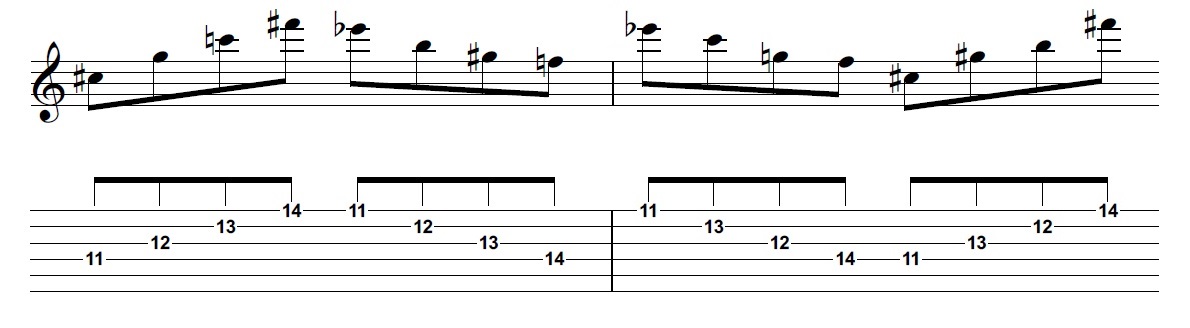
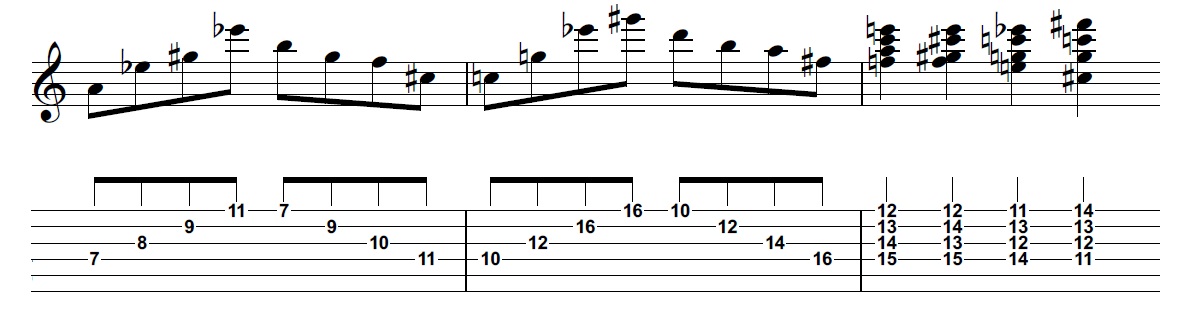
String Skipping Pt. II
The string skipping warm up exercise can be expanded using triplets (by repeating three times the same note on each beat). This presents some difficulty, as the pick falls on the start of each group in a different position.
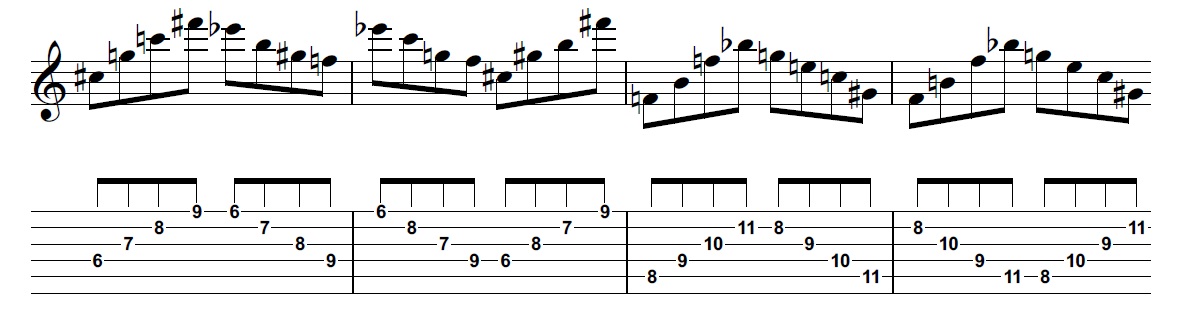
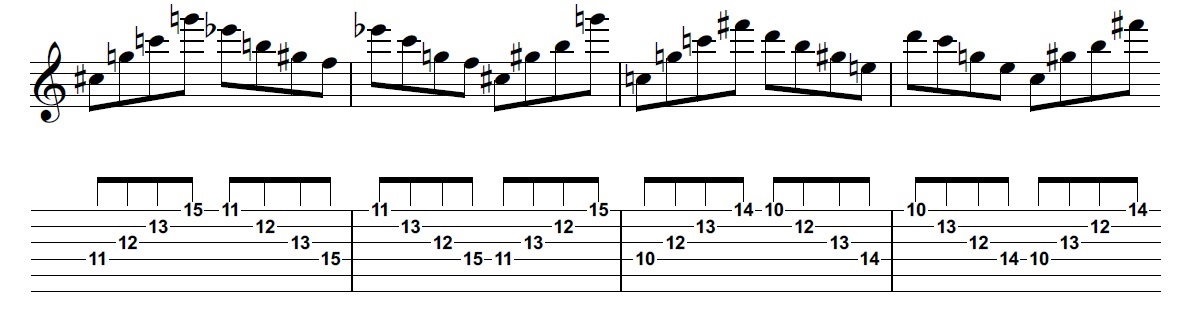
Lastly, it is possible to combine the three picks per note pattern with the previous ones, creating complex rhythms wich will add interest to the exercise. Remember to experiment with different articulations and accents.
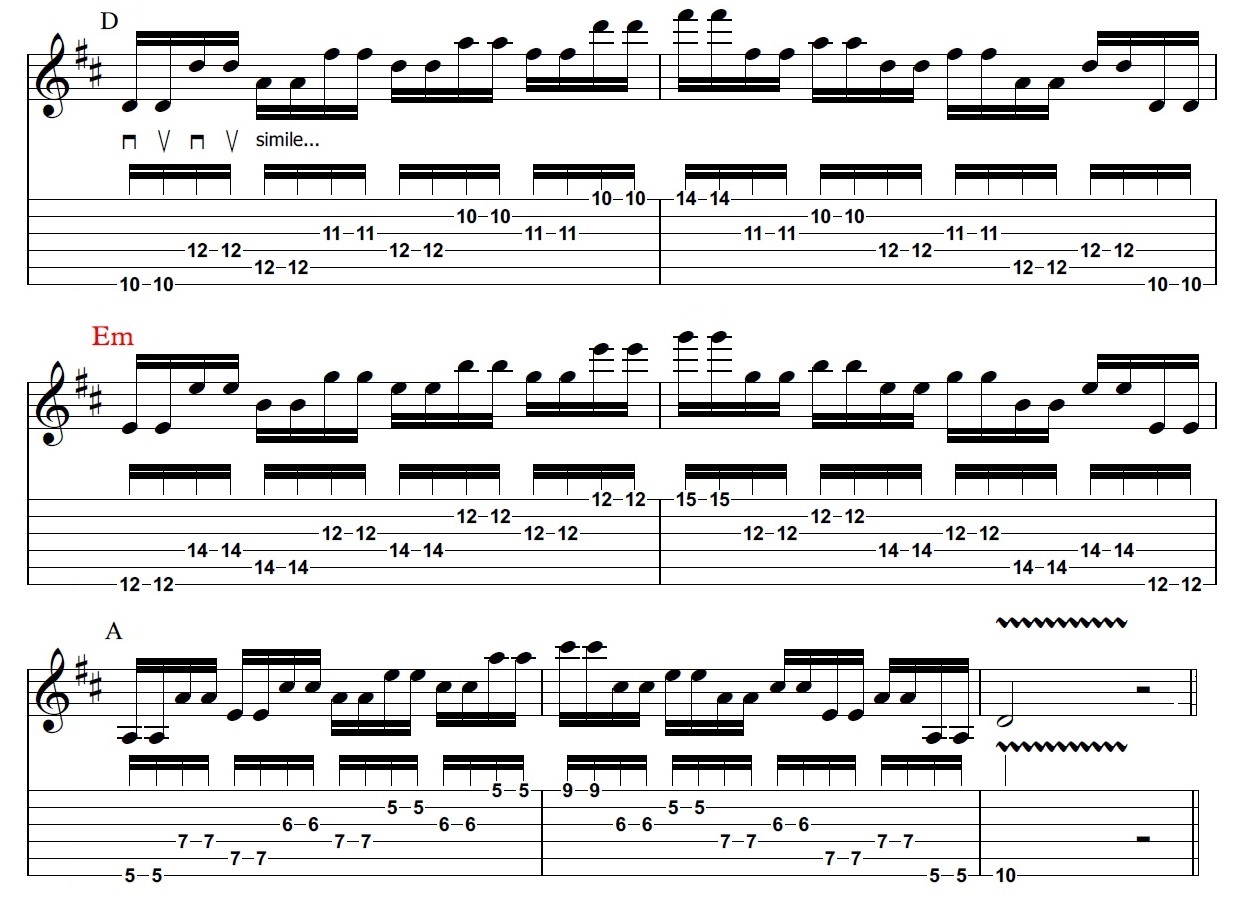
Hands synchronization
The synchronization of both hands is practiced by combining multiple exercises for both hands into a number of tasks which, when perfected, will result in a more efficient coordination. This exercise merges the patterns seen in the left-hand warmup with the string-skipping challenge for the right hand. Move this pattern all the way through the guitar neck.
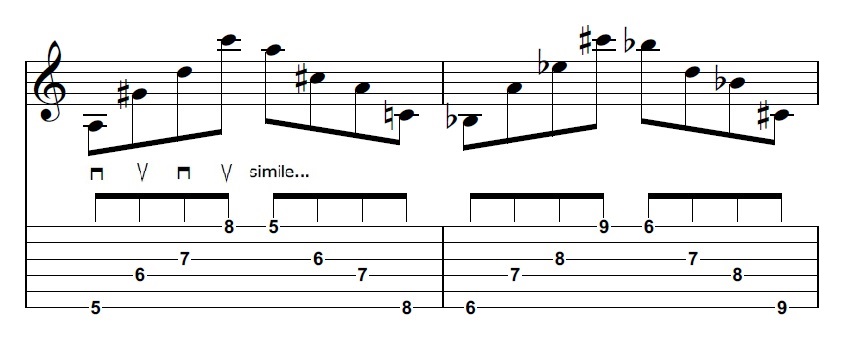
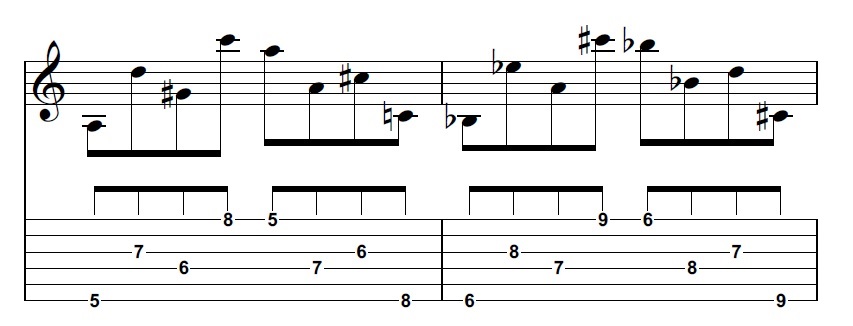
It is advisable to try the exercise applying stretches between fingers, as in
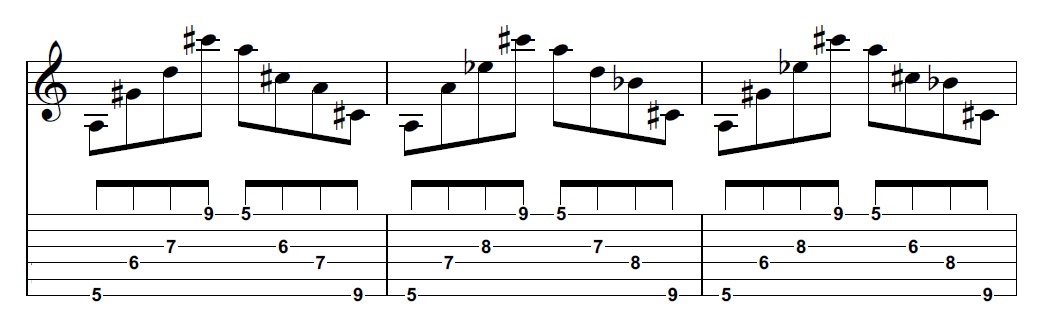
The following variation changes the order of the string skipping. Apply the same stretches between fingers to this exercise.
It is also possible to try reversing the finger order.
Alternate Picking
Using a plectrum or pick to play is one of the most commons way to approach the guitar. The pick is held in the right hand between two fingers, and its tip used to attack the strings on the side of the soundhole. This technique, of course, renders at least two of the right hand fingers unable of playing independently -thus hindering the possibility of complex polyphonic playing. In return, it yields immense benefits in tone control, volume, and speed.
Alternate picking is by far the most used technique in plectrum playing. It involves using a continuous upwards-downwards motion in the picking hand, sometimes even when there are no notes to be played (in order to consistently play upbeats and downbeats with upwards and downwards motions respectively). Tremolo effects become particularly easy to achieve through the use of alternate picking.
Pure downpicking, while useful in certain situations and for certain sounds, is a demanding technique that can quickly become exhausting and difficult to control. It is also rendered impossible by high speed runs, so alternate picking becomes essential for plectrum playing.
Naturally, not every situation can be resolved by employing the alternate picking technique, and sometimes fingerstyle playing, legato playing, sweep picking, or hybrid tapping techniques are a better choice, though alternate picking remains a basic technique, and it should be approached at the beginning of every guitarist's career and perfected on a daily basis.
How to choose and hold a pick
One of the first things to consider when approaching the alternate picking technique is the choice of plectrum. Naturally, variations in thickness, materials, and sizes in different picks yield different results different results. Some may work better for certain techniques or styles than others.
When it comes to melody playing, including the alternate picking technique, it is advisable to avoid extra thin picks -probably a .60mm gauge would be a good start. Regular sized picks are also a good choice for beginners, as small picks tend be easier to drop. As picks become thicker and thicker, they loose their flexibility, and for some guitarists this translates to a lesser capacity to strum in a natural, flowing way (or at least it demands that the player puts more attention to it). The loss of flexibility also implies the loss of the subtle sound the pick makes when it bends, which is an added value when recording strummed guitars. On the other hand, thicker picks respond better to subtle movements, permitting the small and fast movements required for speed playing. Even if the goal isn't speed, they offer more control over the tone and articulation.
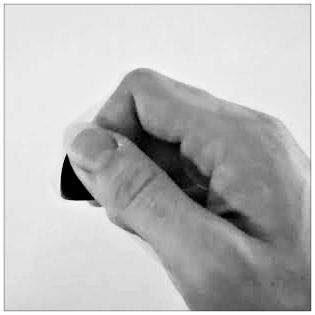
One of the most commons way to hold the pick is letting it rest on the side of the tip of the index finger, and securing it there with the thumb, which should be in an almost 90 degree angle in relation to direction of the pick tip. This is one of the traditional grips, though they vary slightly from player to player. That being said, some famous guitarists hold their picks in surprising ways (Eddie Van Halen holds it between his thumb and middle finger, Pat Metheny uses it backwards, James Hethfield uses three fingers, Brian May uses a coin, and Jeff Beck doesn't use one at all).
When sitting, the top of the right forearm will help hold the body of the guitar, as in the classical position. This leaves most of the forearm, as well as the wrist and hand, free to move. Guitarists differ on how to approach the actual alternate picking motion: some recommend initiating the movement at the elbow, and some at the wrist, with the latter being the most common choice. It seems only natural that the farther from the pick the movement initiates, the harder it becomes to make subtle movements. Following that line, some guitarists opt for the circular motion technique, with the bulk of the movement concentrated in the thumb and index that hold the pick. Guitarist also differ on the position that the rest of the right hand should take, with some recommending resting the little finger on the body of the guitar.
The pick should not attack the strings in a perfect 90 degrees angle, as this usually results in a stiff and awkward motion. It is preferable to employ a slight declination on the wider side of the pick instead, always considering that the more 'slicing' the movement, the less clear the attack. The point where the pick makes contact with the string is also something to take into account: as when playing fingerstyle, attacking near the neck will produce an opaque, mellow sound. As the pick approaches the neck the sound will become increasingly brighter, with more harmonics standing out. This becomes a very important issue when dealing with pick-produced pinch harmonics.
It is advisable to practice every alternate picking exercise with different levels of palm muting. Even muting the strings is not always a need, it can come in handy when playing at great speeds or with intensive distortions, as it helps remove unwanted noise. Resting the heel of the palm of thee bridge of the guitar will do the trick, and varying the pressure will, in turn, act as a turning a knob on the palm muting.
Legato Playing
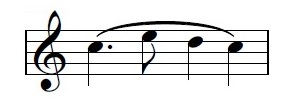
The term legato comes from academic classical music, where it is utilized to indicate that two or more notes are to be played or sung as 'connected' as possible, leaving the minimum possible silence between them. Usually the notes that are to be played in this fashion are graphically grouped by a curved line, or slur. Less frequent is the use of the word legato over the staff.

Naturally, this instruction to play 'as connected as possible' has diverse implications according to the technique of each instrument: bowed string instruments, for example, will normally attempt to play slurred groups of notes by employing a single bow movement. Similarly, wind instruments will usually read slurs as instructions to play without using a tongue articulation for each note.
In the field of guitar playing (mostly on popular styles), the term legato is used interchangeably for the actual articulation and a particular technique, which consists of playing a musical phrase using mainly hammer-ons and pull-offs: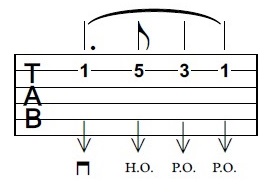
the string is set in motion with the first note played by the pick or the right hand fingers. The following notes are played by means of hammer-ons and pull-offs only. If the musical phrase to be played involves more than one string, the pick may be used to play the first note on each string, activating it and allowing the left hand to play the rest of the notes alone.
The legato technique is an essential tool to develop speed, as it momentarily eliminates the need for strict left-right hand coordination. Sometimes, guitarists will even avoid using the pick or the right hand to set in motion the strings, relying only on their left hand strength. This blurs the line between the legato technique and left-hand tapping (part of the two-hands tapping technique).
From an academic perspective, it should be noted that these are merely the common technical approaches to playing legato, and by no means should the articulation legato be confused with the actual techniques. It is possible to play 'as legato as possible' and still use several bowstrokes, or articulate with the tongue or the pick if it is required (or indicated).
Sweep Picking
Playing single notes on consecutive strings may be difficult when relying only on the alternate picking technique. The permanent direction shifts of the pick, while necessary in most cases, become encumbering in situations such as this:
They take a considerable amount of time, making it almost impossible to perform these kind of licks in a fast and clean way.
Sweep picking is a guitar technique that was largely developed in the 1940's, where the guitarist uses a single constant downwards or upwards pick motion to play a series of notes on consecutive strings. This allows a guitar player to perform fast arpeggios or arpeggio-infused licks and melodies, natural to instruments such as the piano, but unpractical for the guitar when relying on traditional picking only.
Nowadays sweep picking is a standard item in every guitarist's technique repertoire, with a number of common fretting shapes being basic tools for improvisation. Sweep picking is usually combined with other techniques, both to create interest and to extend the possibilities it offers.

Fingerstyle
The term fingerstyle does not refer to a specific style or genre of music, but rather to a technique that involves playing the guitar by plucking the strings with the fingernails or fingertips, as opposed to doing it with a plectrum or pick. The universe of possibilities that the fingerstyle technique creates makes it look more like a whole different approach to the instrument than a particular technique.
Fingerstyle arguably makes the most of the polyphonic capabilities of the guitar. As strings are struck by individual digits, guitarists are able to play more than one melodic line, and thus cover several textural elements as once.

It is possible to extract a great variety of sounds from the fingerstyle technique, depending on factors such as the length and shape of nails, the possibility to use the fingertips instead of nails, the point where the fingers make contact wit the string, the angle at which they make contact, etc. There is also less need to develop a damping technique on the left hand when playing non adjacent strings, as the right hand can avoid the strings in between.The fingers employed individually can attack non-adjacent strings as opposed to the hand used as a single element in traditional picking techniques. Chords become easier to play, whether it be in arpeggiated form (where fingers are a more reliable choice than string skipping) or in block form (up to five strings can be played simultaneously). Complex strumming patterns arise from the individual use of fingers (as in Spanish flamenco).
Conversely, tremolo techniques are much harder to perfect when playing fingerstyle, and it is not as easy to develop speed (starting with the fact that fingers normally attack the strings in a single direction whereas plectrums can alternate directions). Fingernails have to be taken care of, and this usually becomes an enormous issue for fingerstyle playing: they have to be filed, shaped, kept at the right length and thickness. Nylon strings and light gauge steel strings are normally easier to play than heavy gauge strings. Some players compensate for this employing picks that conveniently attach to every finger of the right hand, though, needless to say, these do not yield the same results in terms of tone control.
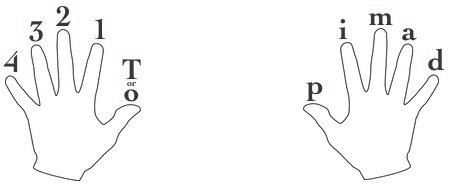
Fingerstyle is the default technique for when approaching the guitar in a classical/academical fashion. In classical guitar tabs are rarely used (except for beginners instruction, or renaissance and medieval music), with traditional notation being the standard. Fingerings are usually given in the score, either by the publisher or the composer. The left (fretting) hand fingers are referred to as 1, 2, 3, and 4 (1 being the index). The right hand fingers are p (thumb), i (index), m (middle), a (ring), and x (or e, little). Naturally, there are certain conventions in guitar fingerings to be studied.
Even though finger playing is the traditional technique in classical music, some non-academical genres tend to see it as an alternative way of playing. It is often seen in acoustic guitar players, and less frequently in electric guitar players (with notable exceptions being Chet Atkins and Jeff Beck, among others). Flamenco guitar is closely related to the classical approach, though it has its own set of techniques. There is a also distinct set of techniques known as fingerpicking, used in certain forms of folk and country music.
Most complete players will have some notions of fingerstyle, even if they regularly incline to play with a plectrum. The possibilities that arise from playing with the fingers take the guitar to a higher level as a soloist instrument. In this line, it is highly recommended that students develop fingerstyle skills.
Tapping
The tapping technique is arguably the most popular of the extended techniques for the guitar. A number of players hailing from different backgrounds perfected variations of the concept throughout the 20th century, though it was definitely brought into the mainstream by Edward Van Halen in the late 70s.
The technique itself consists of fretting the string in the same motion that sets it into vibration. In other words, a single movement is done, 'hammering' the string against the fretboard at a given point, normally with the right hand index or middle fingers. This results in a smooth sounding note, which can be sustained, slided, or more commonly pulled off into any note fretted by the left hand, or an open string. This allows the guitarist to play intervals that would otherwise be impossible to make in a single movement with the left hand only.
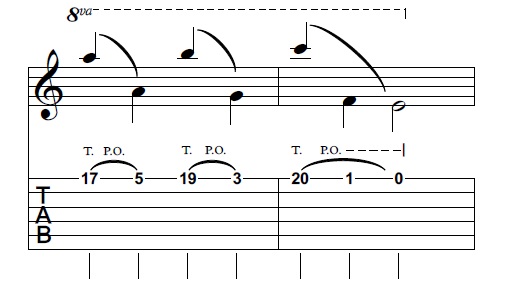
This kind of one handed tapping technique, when combined with left hand pull-offs and hammer-ons, can result in a virtually infinite number of patterns that not only give the player the tools to play passages conceived for other instruments, but also, by doing so, pushes the boundaries of the artistic possibilities within the guitar. One of the most common uses is to play extremely fast arpeggiated chord sequences and variations.
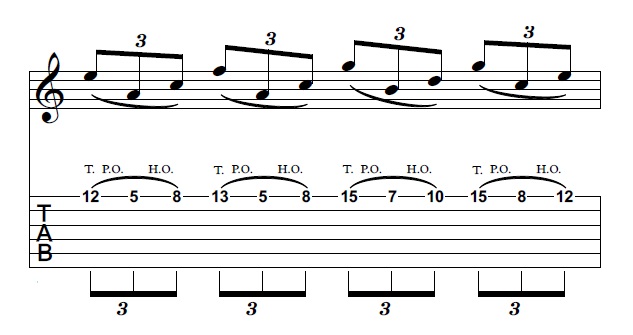
As opposed to one handed tapping, which usually employs one or two fingers from the right hand, two handed tapping often employs eight or nine fingers, making it possible to play complex polyphonic textures on the guitar. Guitarists have experimented with different approaches to this, with Emmet Chapman credited as being one of the firsts to use his right hand fingers parallel to the frets. He later developed his own instrument, now called the Chapman Stick, which is almost exclusively played by using two handed tapping. A number of instruments developed on the same principles exist, though the Stick is arguably the most popular one.
Though mostly used by electric guitar players, tapping can be performed on steel-string and nylon-string acoustic instruments also. Modern amplification paved the way for a number of unconventional techniques to be extensively used in acoustic guitars, with tapping being one of them. When used in the electric guitar, tapping can be performed with high levels of overdrive and compression, in order to boost the tapped notes and even out the volumes of the passages.
Some guitarists choose to tap their guitars with picks or other objects, producing particular effects.
[The header image, originally uploaded to Wikimedia Commons by StickEnterprises, is licensed under the Creative Commons Attribution Sharealike 3.0 Unported License]
Study Tips
Time management
Time management is easily one of the most overlooked aspects when it comes to practicing guitar skills. it is a well known fact that practice makes perfection, and some musicians may stick to repeating this, hoping that investing a certain number of hours per day is enough to make the progress they hope for. The truth is that the quality of each practice session is as important as the actual time invested, if not more. In other words, practicing correctly is all about making a good use of time.
It is not uncommon to hear about musicians that practice four, six, maybe even eight hours a day. Impressive as it may sound, it is not a feasible possibility for everyone. Musicians who take their studies seriously may also have unrelated full time day jobs, academic pursuits, and general activities that may end up taking up most of the scarce twenty four hours that make each day. Needless to say, putting in a lot of time has obvious benefits, but it's more of an ideal situation than an actual possibility for most people. In the light of these considerations, time management becomes an important factor for practicing guitarists. One of the first things to take into account is the difference between playing and practicing, which is easily forgotten once the fingers have been set in motion. While playing specific pieces, songs, or riffs may be part of a practice schedule (if they are included in a setlist, for example), it is crucial to make a distinction between playing with a purpose and just moving your fingers over the fretboard without any real goal.
This last activity may in fact be useful sometimes, as a way of relaxing, coming up with new ideas, maybe even loosening the fingers as part of a warmup routine. But it should never be confused with the actual practice time, as casual playing is most often done in a comfort zone of already mastered licks, progressions and techniques. Going over the same things again and again will quickly become boring, reducing the will to even pick up the guitar and eventually making the skills of the player stagnate.
The recommended approach is to have a series of exercises to go over. Once a routine is established, some daily time must be allotted to work on it, whether it is an hour or three. Even doing half an hour a day is more useful than picking up the guitar once a week. It is also not necessary to practice every possible exercise every day. A good way to structure a practice session is deciding beforehand what skills are to be worked on that day. This will result in a focused practice: once the exercises are chosen, the practice time is broken down into 10 or 15-minute blocks, each covering a very specific subject or variation of an exercise.
This facilitates isolating the exercises that demand more practice, while making complex subjects easily manageable. At the same time, it functions as an incentive for practice, as 10 minutes aren't really that much, and a little break is possible after each block. The fragments to be practiced should cover not only specific techniques, but also particular applications, as in B major scale in first shape, using an i m right hand pattern, or A minor arpeggio on the first string using one handed tapping. That way the subject will be broken down into its minimum cells, and the hand will be trained in specific movements that may later be combined.
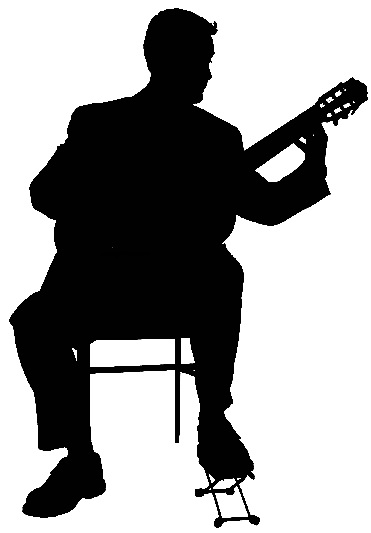
Classical Guitar
The modern classical guitar, sometimes called Spanish guitar, is an acoustical wooden instrument that commonly employs nylon strings, as opposed to the metal strings in acoustic an electric guitars. The traditional classical guitar is merely one member of the guitar family, which includes instruments of different size and construction (such as flamenco guitars, tenor, baritone, and bass guitars, metal stringed guitars, etc).
The term 'modern' is sometimes applied to the Spanish guitar in order to distinguish it from the multiple older forms of the guitar, which includes instruments from the baroque and romantic period. Since the late 18th century (when the sixth string was added) the guitar progressively gained reputation as a solo instrument, but it was late 19th century Spanish luthier Antonio Torres Jurado who established the modern classical guitar design. Musicians such as Segovia and Tárrega helped popularize this version of the instrument, and eventually the previous designs fell away.
The guitar never achieved the status of the piano or the violin in the romantic academic music world. However, a good number of respected composers wrote for the instrument and regarded it in a high esteem: Berlioz studied the instrument, Schubert and Paganini wrote for it, and even Beethoven had words of praise for it. In the 20th century, with Tarrega and Segovia's legacy, the guitar consolidated as an academic instrument.
Classical Guitar Posture
When it comes to guitar playing, there are a number of posture rules that should be considered in order to maximize efficiency. It is only natural that players from different traditions employ their instruments in different ways, though it should be noted that the classical posture is highly effective in terms of reducing fatigue, avoiding strains, and playing comfortably.
The classical guitar posture can be summarized in a series of rules that may not seem significant by themselves, but when put all together can really improve your relationship with the instrument, helping to make the most out of your practice sessions, and ultimately benefiting your overall sound.
I. You should sit near the edge of the chair, so that if you look directly down you can see the floor and not the sit of the chair. Avoid slouching. As for the chair itself, it should have no arms and, if possible, have its seat at such height that when you are sitting, you upper right leg is almost parallel with to the floor. Some guitarists measure this by standing up straight besides the chair and checking that their knees are at the same height as the seat.
II. Your legs should be at about shoulder width distance, with your right knee pointing at 45 degrees to the right, and your left leg point just a couple of degrees to the left. Of course, the final position of the legs is different for each guitarist. Remember that, in any case, the important point is that your body should be supporting the guitar in order to leave your hands free to play.
III. Use a footstool to raise your left leg. There are a number of traditions when it comes to the footstool: you can either use the tip of the footstool or place your whole foot into it, which results in a firmer position but reduces your ability to move it. Some guitarists use a steep slope in their footstool, while others prefer a minimum inclination. The best way to deal with these options is to experiment with each one of them. There is an alternative to the footstool: some players consider that artificially raising your leg ends up causing back pains because it twists the spine, so they employ guitar supports to raise the instrument instead.
IV. Once your legs are in position, the guitar's lower part will rest against your left leg, with the headstock approximately at eye level. The right forearm should make contact with the guitar's body just below the elbow. The weight of this arm will help to hold the instrument in place.
V. It is important that both arms can fall off naturally to the sides before raising them to play. The left hand should be able to move through most of the neck without having to drop the left shoulder. The correct posture for the right hand is a immense subject on its own, but a good starting point is to have the fingers flexed at every joint.
Remember that, in any case, your playing position must be comfortable in the long run. It is important to understand the difference between an immediately comfortable position (you can be more comfortable slouching, for example) and a position that, after extended periods of practice, will not hurt your back or give you severe pains. It is worthy trying to adopt the classical position then, even if at first it feels unnatural or just strange.
It is also advisable to remember that adhering to a certain tradition of sitting and positioning your hands and body doesn't necessarily imply that the guitarist limits his/herself to classical music. The classical posture is practical for a multitude of styles, and some players even adapt it for electric guitar.